04_02 - Inference API
This demo serves the trained model via a FastAPI endpoint and tests it with sample transactions, both through a browser UI and automated test scripts.
Key Concept: What is FastAPI?
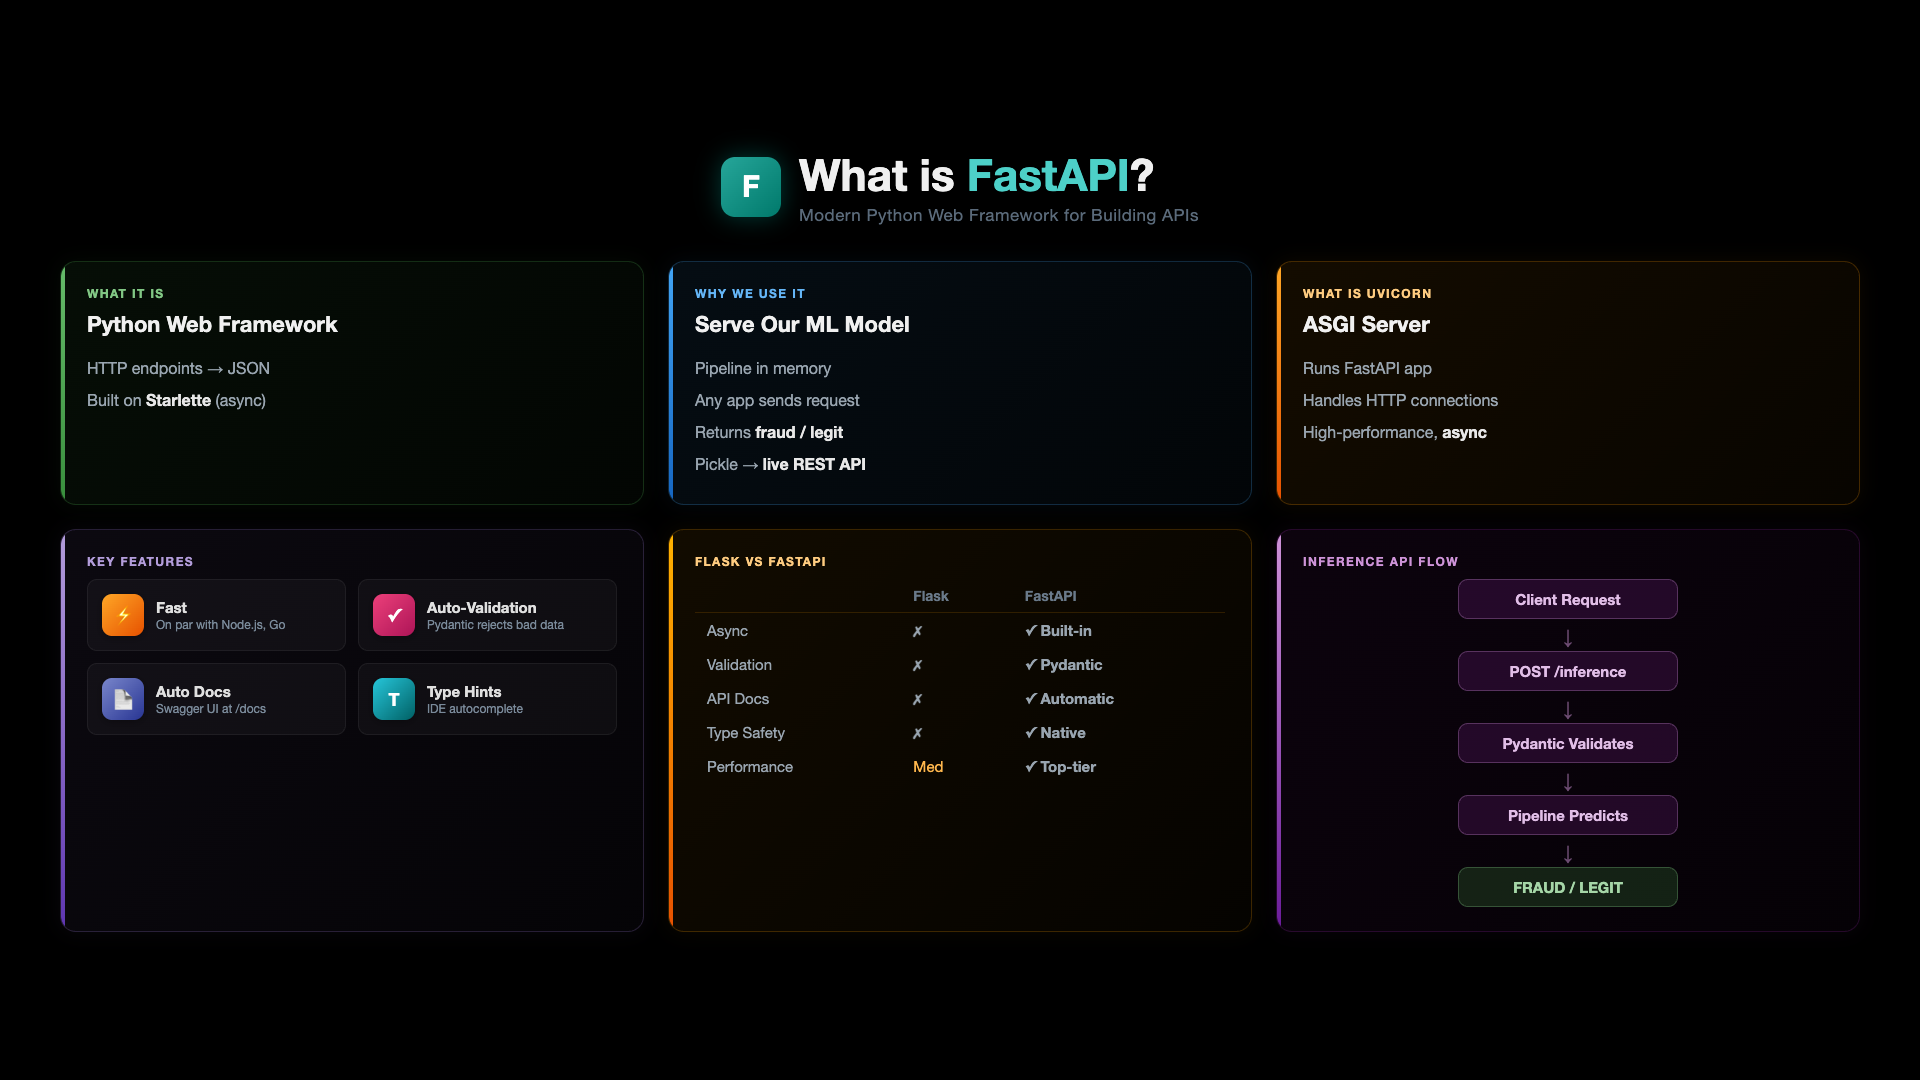
What It Is - FastAPI is a modern Python web framework for building APIs. You define HTTP endpoints (GET, POST) that accept requests and return JSON responses. Built on Starlette (async) and Uvicorn (ASGI server), it is one of the fastest Python frameworks available.
How the FastAPI Stack Works
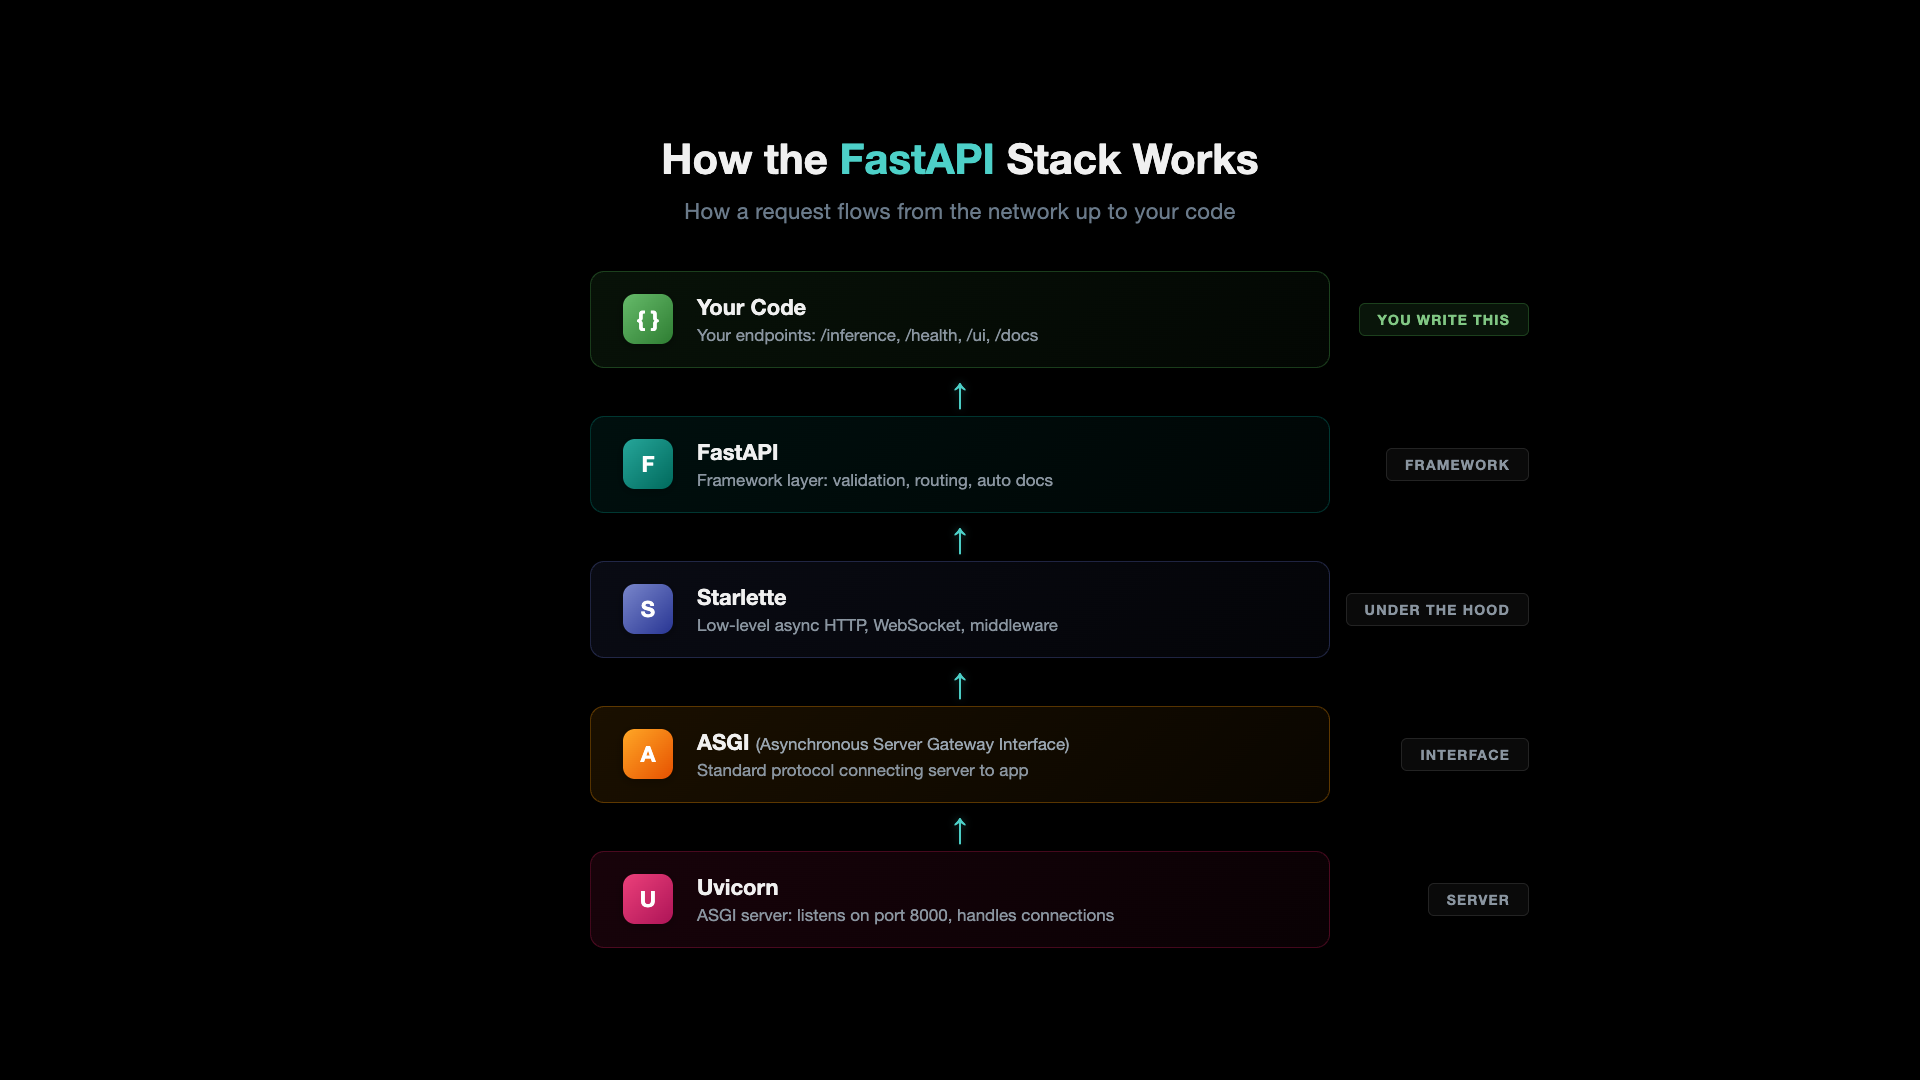
The diagram above shows how requests flow through the stack - from your code (endpoints like /inference, /health) through FastAPI (validation, routing), down through Starlette (async HTTP handling), the ASGI protocol (Asynchronous Server Gateway Interface), and finally Uvicorn (the server listening on port 8000).
Why We Use It - Our trained sklearn Pipeline sits as a pickle file on disk. FastAPI turns that pickle file into a live, callable REST API. Any application - browser, mobile, microservice - sends an HTTP request and gets a fraud / legitimate prediction back instantly.
What is Uvicorn - Uvicorn is the ASGI server that runs FastAPI. It handles incoming HTTP connections with high-performance async processing. FastAPI defines your endpoints, Uvicorn serves them.
Key Features: - Fast - async by default, on par with Node.js and Go - Auto-Validation - Pydantic rejects bad data before it reaches your code - Auto Docs - Swagger UI at /docs with zero extra code - Type Hints - IDE autocomplete and error checking
Flask vs FastAPI - Flask requires manual validation, manual async, and add-on packages for docs. FastAPI provides all of that built-in: Pydantic validation, async support, automatic Swagger docs, native type safety, and top-tier performance.
Inference API Flow:
Pre-requisite: Python Environment Setup
# Create conda environment
conda create -n mlops-env1 python=3.14 -c conda-forge -y

# Activate environment
conda activate mlops-env1

# Install dependencies (locked versions)
cd ccfd-project
pip install -r requirements.txt
Note: All sections in this course use the same
mlops-env1environment. You only need to create it once. After that, just activate it withconda activate mlops-env1before running any scripts.
Step-01: Review the API Scripts
| File | Description |
|---|---|
ccfd-project/p3_02_inference_api_baseline.py | FastAPI inference server (port 8000) |
ccfd-project/p3_03_inference_test_baseline.py | Automated API test script (3 test cases) |
ccfd-project/templates/index.html | Browser-based testing UI |
Project Structure
04_02_Inference_API/
├── README.md                              # This file
└── ccfd-project/
    ├── p3_02_inference_api_baseline.py    # FastAPI server
    ├── p3_03_inference_test_baseline.py   # Test script
    ├── requirements.txt                   # Python dependencies
    ├── utils/
    │   ├── __init__.py
    │   ├── data_utils.py
    │   └── model_utils.py
    └── templates/
        └── index.html                     # Browser testing UI
API Endpoints
| Endpoint | Method | Description |
|---|---|---|
/ | GET | API information |
/health | GET | Health check |
/ui | GET | Browser-based testing form |
/inference | POST | Make prediction |
/docs | GET | Swagger UI documentation |
Step-02: Start the API Server
Prerequisite: Each section has its own
ccfd-project/folder. You must generate data and train the model first before starting the API.
# Terminal 1: Generate data, train model, start API
cd 04_Model_Training_and_Inference/04_02_Inference_API/ccfd-project
python p1_01_generate_initial_dataset.py    # Generate data (required first)
python p3_01_train_model_baseline.py        # Train model (required for API)
python p3_02_inference_api_baseline.py      # Start API server
Alternative: If you're using the shared folder, run all commands from
ccfd-project-main/instead. See Shared Project Folder in the root README.
Expected Output:
======================================================================
BASELINE INFERENCE API
======================================================================

Loading model from: models/p3_01_baseline/
Model loaded successfully!
   Model: LogisticRegression
   Features: 8
   Threshold: 0.5

Starting server on http://127.0.0.1:8000
API docs: http://127.0.0.1:8000/docs
Test UI: http://127.0.0.1:8000/ui
Step-03: Test in Browser
Open http://127.0.0.1:8000/ui in your browser.
The browser UI provides a form where you can enter transaction details and get real-time predictions. Try these test scenarios:
| Scenario | Amount | Hour | Merchant | Card Present | International | Expected |
|---|---|---|---|---|---|---|
| Normal grocery | $50 | 14 | grocery | yes | no | Legitimate |
| Suspicious | $2,500 | 3 | electronics | no | yes | Fraud |
| Edge case | $1,500 | 2 | jewelry | no | yes | Fraud |
Step-04: Run Automated Tests
# Terminal 2: Run test script (keep API running in Terminal 1)
cd 04_Model_Training_and_Inference/04_02_Inference_API/ccfd-project
python p3_03_inference_test_baseline.py
Test Transactions (built into script):
| # | Transaction | Amount | Hour | Expected Risk |
|---|---|---|---|---|
| 1 | Normal grocery | $50 | 14 (2 PM) | Low |
| 2 | Suspicious electronics | $2,500 | 3 (3 AM) | High |
| 3 | High value jewelry | $1,500 | 2 (2 AM) | Medium-High |
Expected Output:
======================================================================
Testing Health Endpoint
======================================================================
Status: healthy
Model Loaded: True

======================================================================
Testing Predictions
======================================================================

Normal Transaction
   Amount: $50.00 | Merchant: grocery
   Prediction: legitimate (probability: 0.05)
   PASSED

Suspicious Transaction (High Amount)
   Amount: $2500.00 | Merchant: electronics
   Prediction: fraud (probability: 0.89)
   PASSED

Edge Case (High Value Jewelry)
   Amount: $1500.00 | Merchant: jewelry
   Prediction: fraud (probability: 0.72)
   PASSED

Tests passed: 3/3
Manual curl Test
curl -X POST http://127.0.0.1:8000/inference \
  -H "Content-Type: application/json" \
  -d '{
    "transaction_amount": 2500.00,
    "transaction_hour": 3,
    "days_since_last_txn": 0,
    "avg_transaction_amount": 100.00,
    "merchant_category": "electronics",
    "card_present": "no",
    "international": "yes",
    "transaction_count_24h": 7
  }'
Expected Response:
{
  "prediction": "FRAUD",
  "probability": 0.89,
  "threshold": 0.5,
  "risk_score": "HIGH",
  "confidence": 0.78,
  "model_name": "p3_01_baseline",
  "message": "Transaction flagged as FRAUD (probability: 0.89)"
}
Step-05: Recap - What We Built
| Component | What It Does |
|---|---|
| Data Generator | Creates 10,000 synthetic transactions with realistic fraud patterns |
| Training Pipeline | sklearn Pipeline (OneHotEncoder + StandardScaler + LogisticRegression) |
| Inference API | FastAPI server with real-time fraud predictions |
| Browser UI | Interactive testing form at /ui |
| Test Script | Automated validation with 3 test scenarios |
Business Results
| Metric | Value |
|---|---|
| Fraud Caught | 46/60 (77%) |
| False Alarms | 289 |
| Net Benefit | $39,625 |
This is the core pattern - data -> train -> serve. Every MLOps tool we add in later repos (DVC, MLflow, Kubernetes, CI/CD, Kubeflow) builds on top of this foundation.
Next Steps
| Next | Topic | What You'll Do |
|---|---|---|
| 05_EDA_and_Preprocessing | Exploratory Data Analysis | Analyze fraud patterns, correlations, generate visualizations |
Prefer to learn by watching?
The video course builds this whole project with you on screen, step by step.
04 A - Train Baseline Model Next: 05 - EDA and Preprocessing